|
|
How to use and lay American “S” Gauge Track
|
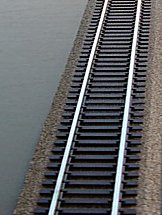
American "S" Gauge Flex
Track
The Flex Track comes in full 60" lengths (5 feet). The Flex Track was designed this way for making larger radius curves and longer track runs with less rail joint connections. The Flex Track has both solid rails that float, allowing it to bend easily. When you assemble the two track sections together, first remove the rail joiner on one end of the flex and then connect both rails into the rail joiners supplied. Then on the bottom, slide in and snap the two plastic track tie sections together with care. When bending the flex track into the desired shape (not less than a 19” radius, 38” centerline diameter), the bottom broken tie should always be on the inside of the curve. As you are forming your track pattern you can use temporary pins every 6” or so to hold track in place until you are sure of placement. Once you are sure of the placement, mark the top of the rail, bend a little further, and clip the excess rail (recommend Xuron model no.2175B track cutter, following mfg. Instructions), and return it to your marked placement and tack down the track (using track nails, spikes or screws, your preference, with white glue) to the roadbed or tabletop. Install the next section of flex-track with rail joiners and proceed as before. You can also make custom straight sectional sections of 20”, 30”, 40”, and 50” lengths simply by unsnapping at the tie halves on the bottom. Make sure you mark rails on top correctly, before unsnapping tie halves, and cutting the rails to ensure a nice fit. If you are going to solder the rail joiners, we use Kester "44" Rosin Core Solder with a tin/lead alloy content of 60/40. |
|
|
American "S" Gauge Sectional Track
The Sectional Track should be assembled on a flat surface making sure that both solid rails fit together by means of the rail joiners supplied. These rail joiners should be fitted carefully, making certain that the rail slides into both the rail joiners prior to snapping the track sections together to make a snug fit and excellent electrical contact.
|
|
| Flexxbed Roadbed for Track
Any
manufacturer of roadbed
will
work. We
use Flexxbed™ “S” Scale roadbed, part number X414126 made by Hobby
Innovations. The roadbed
is 2 3/8”
wide on
the bottom, 1 7/8”
on the top X 35 1/2” long X 1/4” thick. The roadbed is easy to form,
has ultra sound
absorbtion, will not shrink, warp or swell, manufactured from UV
resistant material and easy to ballast. You can order on line
at www.hobbyinnovations.com For more additional information call
them at
(423) 727- 8000.
|
|
Instructions for Making up Custom Lengths of Track It is very easy and simple to make up custom curve and straight lengths of track. 1) Remove the rail joiner from the end you are not going to use.  2) Mark with pencil or marker pen the length to be cut on the top of the rails in the center of the tie on both rails. Check again to make sure your length is correct.  3) Turn over track and cut plastic away one tie on each side from your top rail markings to give clearence to cut rail. (We recommend and use the Xuron no. 2175B track cutter with excellent results. Read the mfg instructions on its use. One side cuts clean and flush, the other side acts as a shear. Check yourself to make sure you have the track cutter correct before cutting rail.  4) Once you have cut the rails save the end piece you just cut off with the snap lock section. Cut three ties back and slide snap section off rails.  5) Measure and cut the snap lock ties to fit back on the new section of rails. Install snap lock, put rail joiner back on and you now have a new custom cut track section with snap lock.        |
|
We hope the above tips will help you to achieve the Model Railroad you've always wanted.
| Home | Classic Trains | Contact Us | ||
| American "S" Gauge Track System | ||||
| ASG-Home | ASG-Beginings | ASG-Usage | ASG-Track | ASG-Pictures |